Introduction
With Oryx, you can easily record your live streaming and publish it on a web page for your audience to access. In this blog, we will guide you through the process of recording live streaming to an MP4 file using Oryx.
Live streaming has become increasingly popular, and many content creators want to record their live streams for later use or to provide their audience with video-on-demand (VoD) content. While there are various methods to record live streams, such as using OBS, some embedded devices may not support recording or may be difficult to control. In such cases, server-side recording can be a more efficient solution.
Step 1: Create Oryx by One Click
Creating an Oryx is simple and can be done with just one click if you use Digital Ocean droplet. Please see How to Setup a Video Streaming Service by 1-Click for detail.
You can also use Docker to create an Oryx with a single command line:
docker run --rm -it -p 80:2022 -p 443:2443 -p 1935:1935 \
  -p 8080:8080 -p 8000:8000/udp -p 10080:10080/udp --name oryx \
  -v $HOME/data:/data ossrs/oryx:5
After creating the Oryx, you can access it through http://your-server-ip/mgmt via a browser.
Step 2: Publish a live stream to Oryx
You can use OBS or FFmpeg to publish a live stream to Oryx. You can also set up HTTPS and publish via WebRTC.
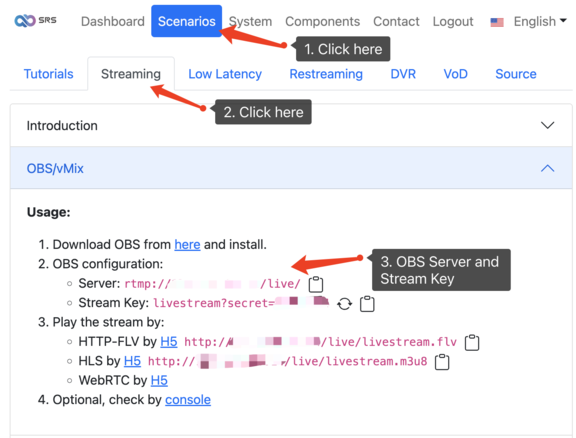
Once the stream is published, you can preview it using an H5 player or VLC. Please see How to Setup a Video Streaming Service by 1-Click for detail.
Step 3: Record the Live Stream by Oryx
Once your live stream is published, you can start recording it using Oryx. To do this, open the
Scenarios > Record > Setup Record Rules section and click the Start Record button.
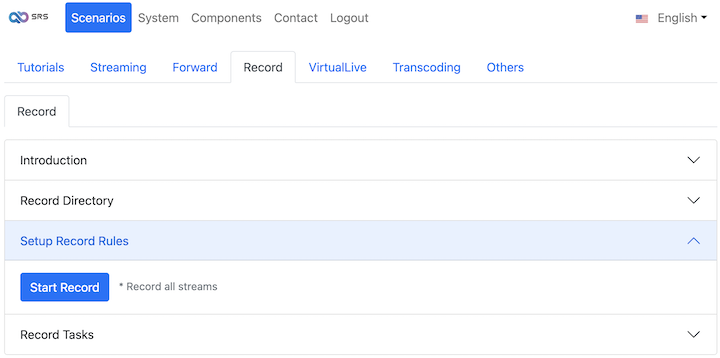
The recording process will begin, and you can monitor the progress of your recording tasks.

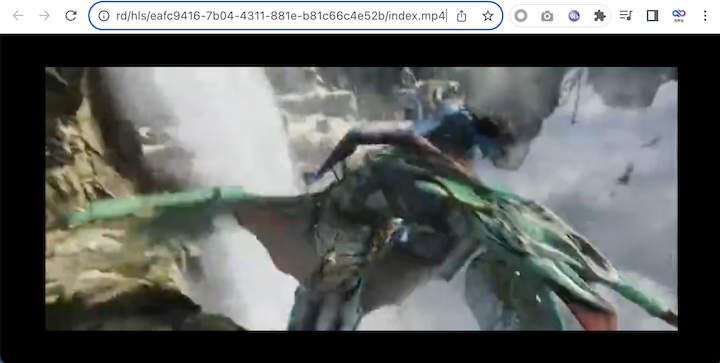
Step 4: Stop and Download MP4 File
When you want to stop recording, click the Stop Record button in the Setup Record Rules section. Wait for
a few seconds for the recording to stop. If the live stream is no longer being published, Oryx will
automatically stop the recording task after a few minutes (e.g., 5 minutes).
After the recording has stopped, Oryx will transmux the recorded file to MP4 format. You can then preview and download the MP4 file for further use or distribution.
How to Record Specific Streams?
See How to Record a Specific Stream
How to Record to S3 Cloud Storage?
See How to Record to S3 Cloud Storage
How to Merge to One Mp4 File?
See Recording Doesn't Stop When the Stream is Stopped and How to Quickly Generate a Recorded File
Cloud Service
At SRS, our goal is to establish a non-profit, open-source community dedicated to creating an all-in-one, out-of-the-box, open-source video solution for live streaming and WebRTC online services.
Additionally, we offer a Cloud service for those who prefer to use cloud service instead of building from scratch. Our cloud service features global network acceleration, enhanced congestion control algorithms, client SDKs for all platforms, and some free quota.
To learn more about our cloud service, click here.
Conclusion
Recording live streaming to an MP4 file is a valuable feature for content creators who want to provide their audience with video-on-demand content. With Oryx, the process of recording, stopping, and downloading your live streams is simplified, making it easy for you to manage and distribute your recorded content. By following the steps outlined in this blog, you can quickly and efficiently record your live streams and make them available for your audience to access whenever they want.
Contact
Welcome for more discussion at discord.
