FAQ
Note: This is FAQ for Oryx, please see SRS FAQ for SRS FAQ.
Quick Content
- Getting Started: How to use, start, and get started with Oryx Server.
- How to Upgrade: How to upgrade to the latest or stable version, and why the interface click upgrade is not supported.
- How to Set a Domain: How to set up a domain to access the admin panel, why can't the admin panel be opened, and why can't the admin panel be accessed via IP.
- Supported Platforms: Supported platforms, supported images, want to use the server or command line installation directly, or aaPanel installation.
- How to Push Multiple Streams: Want to push multiple streams, want to change the default stream name and stream address.
- How to Run Multiple Instances: The machine has a lot of CPU, how can we support more platform forwarding, or more streams and recording, etc.
- How to Set up Free HTTPS: How to apply for a free HTTPS certificate, how to apply for certificates for multiple domain names.
- How to Use Server File for Virtual Live Events: How to upload file to server and use it in virtual live events.
- How to Modify the Push Authentication Key: Update the push authentication key, replace the push key.
- How to Disable Push Authentication: Don't want push authentication, the device does not support special characters.
- How to Change the Recording Directory: How to modify the recording directory to another disk directory.
- Recording Does Not Stop When the Stream is Stopped: Why the recording doesn't stop immediately when the stream is stopped, but instead waits for a certain period before stopping.
- How to Quickly Generate a Recorded File: After stopping the stream, how to rapidly create a recorded file.
- How to Record to S3 Cloud Storage: Record to AWS, Azure, DigitalOcean Space, and other S3-compatible storage options.
- How to Record a Specific Stream: How to record according to specific rules, how to record a particular stream.
- Unavailable After Installation: Error prompt after installation, or Redis not ready.
- Difference Between SRS Restream and OBS Restream: The difference between SRS multi-platform re-streaming and OBS re-streaming plugin.
- How SRS Re-streams to Custom Platforms: How SRS multi-platform re-streaming pushes to custom live platforms.
- Why and How to Limit the Bitrate of Virtual Live Events: Why and how to limit the bitrate of virtual live events.
- How to Setup the Font Style for AI Transcript: How to set up the font style for AI transcript.
- How to Setup the Video Codec Parameters for AI Transcript: How to set up the video codec parameters for AI transcript.
- How to Replace FFmpeg: How to replace the FFmpeg in Oryx with a custom version.
- Installation of SRS is Very Slow: Overseas aaPanel installation is very slow, access to Alibaba Cloud image is too slow.
- How to Install the Latest Oryx: Manually install aaPanel plugin, install the latest plugin.
- CentOS7 Installation Failed: CentOS7 aaPanel installation failed, cannot find the directory, or GLIBC version problem.
- The Difference Between Oryx and SRS: The difference between Oryx and SRS, why there is Oryx.
- Low Latency HLS: How to use low latency HLS, how to use low latency HLS.
- OpenAPI: About open API, using API to get related information.
- HTTP Callback: About HTTP callback.
- Changelog: About versions and milestones.
You can also search for keywords on the page.
Getting Started
Please follow How to Setup a Video Streaming Service by 1-Click to purchase and set up Oryx, please don't skip this step.
After entering the Oryx Server, there will be corresponding video tutorials according to different application scenarios.
Each scenario also has a complete introduction and detailed operation steps.
Please do not try randomly, be sure to follow the guide, audio and video random testing will definitely cause problems.
How to Upgrade
How to upgrade to the latest version or stable version, and why not support click upgrade on the interface?
Since Oryx supports multiple platforms, including Docker, and Docker cannot upgrade itself, Oryx also does not support interface upgrades and needs to be upgraded manually.
If you use HELM, and get oryx 1.0.1 installed, then you can upgrade by helm upgrade srs srs/oryx --version 1.0.6
and helm rollback srs if want to rollback to 1.0.1.
helm upgrade srs srs/oryx --version 1.0.6
The Docker startup specifies the version, such as ossrs/oryx:v1.0.293, and you only need to delete
the container and start with the new version, such as ossrs/oryx:v1.0.299.
If you use ossrs/oryx:5, it is the latest version, and you need to update manually, such as
docker pull ossrs/oryx:5 then remove and restart the container.
docker rm oryx
docker pull ossrs/oryx:5
docker run --restart always -d -it --name oryx -v $HOME/data:/data \
  -p 80:2022 -p 443:2443 -p 1935:1935 -p 8000:8000/udp -p 10080:10080/udp \
  ossrs/oryx:5
If you use aaPanel panel, just delete the application and reinstall the new version, the data is saved in the
/data directory and will not be lost.
How to Set a Domain
How to set up a domain to access the admin panel, why can't the admin panel be opened, and why can't the admin panel be accessed via IP.
Please replace the following domain names and IPs with your own domain names and IPs, which can be either private or public IPs, as long as your browser can access them.
When installing Oryx with aaPanel, you need to enter the domain name of the management backend, such
as bt.yourdomain.com, and it will automatically create the management backend website.
Note: When installing with aaPanel, if you want to use IP access, you can set it to
bt.yourdomain.com, and then set thesrs.stack.localwebsite as the default website in aaPanel.
If you install it in other ways, it's the same. You just need to resolve your domain name to the Oryx IP.
There are several ways to set up domain name resolution:
- DNS domain name resolution: In the backend of your domain name provider, set an A record pointing to the Oryx IP.
A bt.yourdomain.com 121.13.75.20
- Modify the local
/etc/hostsfile in Linux/Unix to resolve the domain name to the Oryx IP.
121.13.75.20 bt.yourdomain.com
- Modify the local
C:\Windows\System32\drivers\etcfile in Windows to resolve the domain name to the Oryx IP.
121.13.75.20 bt.yourdomain.com
Note: If you need to apply for a free HTTPS certificate through Let's Encrypt, the IP address must be a public IP, and you cannot use the method of modifying the hosts file.
Supported Platforms
Oryx supports Docker images, installation scripts, DigitalOcean images, and can be installed on other platforms using aaPanel.
It is recommended to install directly using Docker, which also allows for multiple installations. Be sure to use Ubuntu 20+ system:
- Docker image installation: here
Oryx also support HELM, see srs-helm for detail.
If you are used to aaPanel, you can install it with aaPanel, which can coexist with multiple websites. Be sure to use Ubuntu 20+ system:
- aaPanel: You can download the plugin for installation, and refer to How to Setup a Video Streaming Service with aaPanel for usage.
- Script: You can also use the script directly, refer to Script
It supports various cloud platforms, and the most convenient method is using images, which are cloud server images. If you want to keep it simple and save time, please use images:
- DigitalOcean: Overseas lightweight cloud server images, refer to How to Setup a Video Streaming Service by 1-Click for usage.
If you find that some features are missing, it may be because the version you chose is older. According to the update speed of features:
Docker/Script > aaPanel > DigitalOcean
If you consider convenience and simplicity, the recommended order is:
DigitalOcean > aaPanel > Docker/Script
You can choose the platform and installation method according to your situation.
How to Push Multiple Streams
By default, there is only one push stream address. What if you want to push multiple streams? How to change the stream address?
You can change the stream name, for example, the default push stream address is:
rtmp://1.2.3.4/live/livestream?secret=xxx
You can modify livestream to any other name, and then push directly:
- rtmp://1.2.3.4/live/
any?secret=xxx - rtmp://1.2.3.4/live/
stream?secret=xxx - rtmp://1.2.3.4/live/
you?secret=xxx - rtmp://1.2.3.4/live/
want?secret=xxx
As shown in the figure below, you can click the update button to automatically change the push stream and playback name:
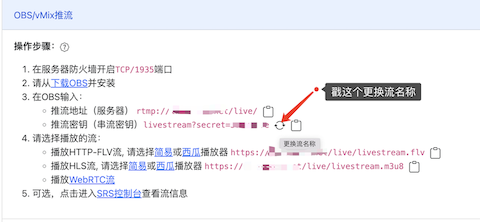
Note: Of course, the playback must also be changed to the corresponding stream name.
How to Run Multiple Instances
The machine has a lot of CPU, how can we support more platform forwarding, or more streams and recording, etc.
You can choose to use Docker to start Oryx, which makes it very easy to run many isolated Oryx instances that don't affect each other and utilize the machine resources.
For example, start two instances listening on ports 2022 and 2023, and use different ports for streaming media:
docker run --restart always -d -it --name oryx0 -it -v $HOME/data0:/data \
  -p 80:2022 -p 1935:1935 -p 8000:8000/udp -p 10080:10080/udp \
  ossrs/oryx:5
Then, open http://localhost to log in to the backend.
docker run --restart always -d -it --name oryx1 -it -v $HOME/data1:/data \
  -p 2023:2022 -p 1936:1935 -p 8001:8000/udp -p 10081:10080/udp \
  ossrs/oryx:5
Then, open http://localhost:2023 to log in to the backend.
Note: Be careful not to use duplicate ports and make sure the mounted data directories are unique. Keep the two Oryxs completely separate.
Although the Oryx web UI doesn't display the RTMP port because it uses the same port 1935 within the docker, this doesn't cause any issues. You can still publish to each stack using different RTMP ports. However, you can setup the exposed ports:
docker run --restart always -d -it --name oryx1 -it -v $HOME/data1:/data \
  -p 2023:2022 -p 1936:1935 -p 8001:8000/udp -p 10081:10080/udp \
  -e HTTP_PORT=2023 -e RTMP_PORT=1936 -e RTC_PORT=8001 -e SRT_PORT=10081 \
  ossrs/oryx:5
If you only need multi-platform streaming or virtual streaming without involving the push stream port, you can use it directly.
If you need to push streams to two Oryx instances, you need to specify the ports, such as pushing streams to these two Oryxs:
rtmp://ip:1935/live/livestreamrtmp://ip:1936/live/livestream
Other protocol ports should also be changed accordingly, such as HLS:
http://ip:2022/live/livestream.m3u8http://ip:2023/live/livestream.m3u8
Of course, this doesn't mean you can start thousands of Oryxs. You should pay attention to your CPU and memory, as well as whether your machine has enough bandwidth.
How to Set up Free HTTPS
Oryx supports applying for free HTTPS certificates, and you can apply for certificates for multiple domain names and automatically renew them. For example, the certificates for the following HTTPS websites are all automatically applied after running Oryx:
- https://ossrs.io SRS's global documentation website.
- https://ossrs.net SRS's official website in China.
The operation is very simple, just follow these three steps, please see here:
- Purchase a domain name and complete the filing. You must have your own legal domain name, otherwise, you cannot apply for a certificate.
- Resolve the domain name to the public IP of Oryx. You can add multiple domain names to resolve, for example,
ossrs.ioandwww.ossrs.ioare both resolved to the same Oryx server. - In Oryx's
System Settings > HTTPS > Automatic HTTPS Certificate, fill in your domain name, separate multiple domain names with semicolons, and click Apply.
Note: Just apply for the domain name, do not upload it again. Once applied, you don't need to upload it again.
Note: If you're using aaPanel to install Oryx, you can choose to apply through aaPanel or apply within Oryx.
If you encounter an error while applying and the message says Could not obtain certificates: error: one or more domains had a problem, the possible reasons are:
- The domain is not pointing to the Oryx's IP. You must use DNS to point the domain to the Oryx's IP, instead of setting it in the hosts file.
- The IP of the Oryx must be publicly accessible, meaning it should be an IP that anyone on the internet can access, not just within a private network.
- The port must be 80, not 2022, because Let's Encrypt will verify your domain in reverse and access it through port 80.
If use docker to start Oryx, you can add port mapping for 80 and 443:
docker run --restart always -d -it --name oryx -v $HOME/data:/data \
  -p 80:2022 -p 443:2443 -p 1935:1935 -p 8000:8000/udp -p 10080:10080/udp \
  -p 80:2022 -p 443:2443 \
  ossrs/oryx:5
After the application is successful, enter https plus your domain name in the browser, and you can access your website.
How to Use Server File for Virtual Live Events
How to upload file to server and use it in virtual live events.
You can use other tools like FTP or SCP to upload large files to the server, and then use these uploaded
files in Virtual Live Events. However, it's required that the uploaded files be located in the /data
directory.
Oryx runs inside a container, so the /data path mentioned refers to a directory within the container.
You can map a directory from your host machine to the /data directory inside the container. For example,
by using docker run -v /your-host-dir:/data/my-upload, you can access the /data/my-upload directory
inside the container.
Then, when you upload a file to your host directory, such as my-file.mp4, the file in the host is
/your-host-dir/my-file.mp4, you can access it within Oryx by specifying
/data/my-upload/my-file.mp4.
After uploading files, you can also enter the Oryx container to check if the files are present. For example, you can execute the command:
docker exec -it oryx ls -lh /data/my-upload/my-file.mp4
If it indicates that the file exists, you can use this file in Oryx's Virtual Live Events. If not, please check whether the path was mapped correctly when starting Docker.
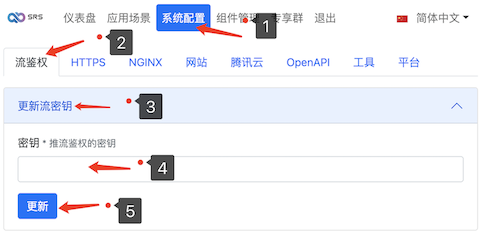
How to Modify the Push Authentication Key
If you need to update the push authentication key or change the push key, you can follow these steps:
- Enter the
System Settingspanel. - Select the
Stream Authenticationtab. - Enter the new stream key.
- Click the
Updatebutton. - Refresh the pages of each scene, and the push key will be automatically updated.
As shown in the picture below:
If you need to disable push authentication, please refer to the instructions below.
How to Disable Push Authentication
In the scene page, the standard push format is with ?secret=xxx authentication, such as rtmp://ip/live/livestream?secret=xxx
It is found that some cameras do not support the ?secret=xxx format, so the address is not supported.
In this case, you can actually put the key xxx directly in the stream name, such as: rtmp://ip/live/livestreamsecretxxx,
and there will be no problem.
Of course, if you only need to push one stream, you can directly use the key as the stream name, such
as: rtmp://ip/live/xxx.
Note: Of course, the playback must also be changed to the same stream name, and the key must be included, because the key is placed in the stream name here, so the playback must also be changed.
This way, there is security, and it can support devices that do not support special characters. In addition, the push key can be changed, so you can change it to the way you want.
How to Change the Recording Directory
Open Record / Record Directory to see the default recording directory. If you want to use a different directory,
follow these steps:
If you are using Docker to start the Oryx, you can mount the directory to another path, like this:
docker run -v /your-host-dir:/data/record
If you installed the Oryx using another method, you can create a symbolic link from the default data directory to another directory, like this:
rm -rf /data && ln -sf /your-host-dir /data
Note: Please do not directly create a symbolic link for
/data/record, as the Oryx runs in Docker and cannot see your linked directory.
Important: If you want to use cloud storage like S3, do not use the mounting method, as frequent recording writes may cause the cloud storage to hang and become inaccessible. Instead, use the file copying method. For more information, please refer to How to Record to S3 Cloud Storage.
Recording Does Not Stop When the Stream is Stopped
Why the recording doesn't stop immediately when the stream is stopped, but instead waits for a certain period before stopping.
Some live streams only push the content once without any interruptions. In this case, if the stream stops recording, it's okay to stop the recording as well. This will only generate one file.
Some broadcasters experience interruptions during live streaming. For instance, if there's a 30-second pause in between a 5-minute stream, stopping the recording at the pause will create multiple files. This situation poses a problem.
How to Quickly Generate a Recorded File
As mentioned earlier in Recording Doesn't Stop When the Stream is Stopped, to achieve recording as a single file, especially when merging into one file after interrupting the stream, the Oryx does not immediately generate a recorded file when the stream is stopped. Instead, it waits for a certain period before generating the file due to a timeout.
So, how can we quickly generate a recorded file after stopping the stream? You can click a button on the interface or use the HTTP API to request the end of the recording task after the stream is stopped. This way, the recorded file can be generated as quickly as possible.
Similar to YouTube's live room, there is usually an End Stream button in the live room. Clicking this button
will stop the stream and request the end of the recording task.
Note: Requesting the end of the recording task is an asynchronous interface. The recorded file will not be generated immediately after the call, as processing live slices takes time. Wait for a certain period before the final recorded file is generated, based on the callback event.
How to Record to S3 Cloud Storage
Record to AWS, Azure, DigitalOcean Space, and other S3-compatible storage options.
First, use s3fs to mount the S3 storage to your local disk, such
as the /data/srs-s3-bucket directory. Please refer to the manual of your cloud provider for specific details,
as there are many resources available online. You can run the following command to check if you can access
the files in the S3 storage:
ls -lh /data/srs-s3-bucket
Note: It is essential to restart the Oryx after mounting the storage to access the mounted directory.
Next, in the Oryx recording settings, choose Setup Recording Rules > Post Processing > Copy Record File, and
enter the folder /data/srs-s3-bucket. This way, after the recording file is generated, it will be copied to
the S3 storage, and the file path in the S3 storage generally should be:
/data/srs-s3-bucket/{RECORD-UUID}.mp4
You can use the S3 HTTP viewing feature or CDN distribution to directly watch the recorded files or process them further.
If you need to disable this feature, you can set the target folder to be empty.
Please pay special attention not to mount the entire /data or /data/record directory to the cloud drive.
The Record directory contains many temporary files, and accessing this directory while previewing recorded
streams can cause significant stress on the cloud storage, potentially leading to suspension. It is recommended
to use the /data/srs-s3-bucket directory or more specific subdirectories, such as /data/srs-s3-bucket/yours.
Please note that it is essential to mount the directory under the /data subdirectory for Oryx to
access it properly. If you can only mount to other directories, it is recommended to use Docker to start
Oryx and specify -v /your-host-dir:/data/srs-s3-bucket, allowing Oryx to access the files.
How to Record a Specific Stream
How to record according to specific rules, how to record a particular stream?
The Oryx allows you to configure a Glob Filter, which records only the streams that adhere to the defined
rule. To set the Glob Filter, navigate to Record > Setup Record Rules > Extra Glob Filters.
For instance, if the filter is configured as /live/*, it will record only streams within the live app, such
as /live/livestream and /live/show, but not /other/livestream.
It is possible to modify Glob Filters even after initiating the recording, without restart the recording process. You can establish the filter even if the stream is already being published. The updated filters will be applied to new segments of the stream.
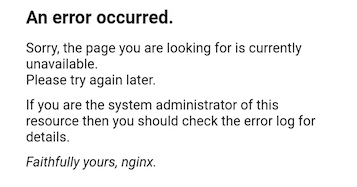
Unavailable After Installation
In the new version of the aaPanel plugin, to avoid conflicts with existing website settings, it no longer automatically sets itself as the default website. Instead, you need to specify a domain or manually set the default website. Please refer to How to Set a Domain.
After installation, an error is prompted, such as:
Or Redis is not ready, such as:
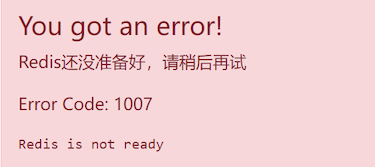
This is because it takes time for Oryx to start after installation. Refresh the page after waiting for 3 to 5 minutes.
Difference Between SRS Restream and OBS Restream
SRS's multi-platform restreaming can push the stream to multiple platforms, and its working diagram is as follows:
OBS/FFmpeg --RTMP--> Oryx --RTMP--> Video number, Bilibili, Kuaishou, and other live streaming platforms
In fact, OBS also has a restreaming plugin, and its working diagram is as follows:
OBS --RTMP--> Video number, Bilibili, Kuaishou, and other live streaming platforms
It seems that OBS's link is shorter and simpler, and it doesn't need to go through Oryx or pay money. So why does Oryx still need to do restreaming, and what are the drawbacks of OBS's solution?
The advantage of OBS restreaming is that it doesn't cost money and can be restreamed directly. The disadvantage is that its uplink/upload bandwidth is doubled. For example, a 2Mbps stream, if restreamed to 3 platforms, will be 6Mbps. If more video numbers need to be pushed, it will be even more, such as pushing to 10 platforms, which will be 20Mbps.
Higher bandwidth will cause all push streams to stutter or interrupt, making it impossible for all viewers to watch the live broadcast, resulting in a live broadcast accident. As long as there is a rollover once, most of the people in the live broadcast room will run away, which is a very serious accident.
Basically, 80% of live broadcast rollovers are caused by problems with the anchor's push stream. Because the problems of cloud platforms and viewer viewing have been almost solved, the only unsolvable problem is the anchor's push stream.
If you have a dedicated fiber-optic line at home, such as buying a 100Mbps dedicated line, there will be no problem. The problem is that a 100Mbps dedicated line is very expensive, and even if it is temporarily free, there will be a day when it will be charged because a dedicated line is a dedicated resource and cannot be free forever. It's like someone giving you gold bars for free, how long can it be free?
Oryx also has doubled bandwidth, but it is the downstream bandwidth that is doubled because it has done a conversion, and essentially other platforms are downloading the stream from Oryx. Downstream/download bandwidth is generally more guaranteed. Moreover, between Oryx and the platform, they are all BGP bandwidth between servers, which is more guaranteed in quality than the home-to-platform connection.
How SRS Restreams to Custom Platforms
SRS's multi-platform restreaming can push to custom live streaming platforms, such as pushing to the video number's push stream address and stream key, and can also fill in any other live streaming platform.
Note: The reason why Oryx is divided into video numbers and platforms like Bilibili is to provide better guidance. The RTMP address format of these platforms is similar, so you can fill in any platform, and Oryx will not verify the specific platform.
If the RTMP address of the live streaming platform is a single address, such as:
rtmp://ip/app/stream
Then, you can split it into:
- Push stream address:
rtmp://ip/app - Stream key:
stream
Note: The part after the last slash is the stream key.
Why and How to Limit the Bitrate of Virtual Live Events
Why and how to limit the bitrate of virtual live events? Many users use 7x24 virtual live events, and exceed the server traffic limit. Typically, AWS Lightsail and DigitalOcean Droplets provide 1TB of monthly traffic, permitting a 3Mbps continuous live stream for 7x24 hours. Therefore, it's crucial to restrict the input bitrate to prevent exceeding the traffic limit.
By default, for virtual live events, Oryx limits the input bitrate to 5Mbps, you can change the limits
from System > Limits > Set Limits to set a higher limits.
How to Setup the Font Style for AI Transcript
How to set up the font style for AI transcript. The Oryx supports setting font styles, using the FFmpeg's force_style format. For more details, please refer to the link provided.
For example, set the subtitle to the bottom center position, with a distance of 20px from the bottom:
Alignment=2,MarginV=20
For example, set the font color to red and the font size to 20px:
Fontsize=20,PrimaryColour=&H000000FF
For example, a YouTube-style style:
Fontname=Roboto,Fontsize=12,PrimaryColour=&HFFFFFF,BorderStyle=4,BackColour=&H40000000,Outline=1,OutlineColour=&HFF000000,Alignment=2,MarginV=20
For example, a Netflix-style style:
Fontname=Roboto,Fontsize=12,PrimaryColour=&HFFFFFF,BorderStyle=0,BackColour=&H80000000,Outline=0,Shadow=0.75
Note: Netflix uses the
Consolasfont, which is temporarily unsupported by Oryx, soRobotois used instead.
For example, a Aesthetic (Vintage Yellow Subtitle) style:
Fontname=Roboto,Fontsize=12,PrimaryColour=&H03fcff,Italic=1,Spacing=0.3
You can test the effects of these parameters using FFmpeg, with the following command line:
cat > avatar.srt <<EOF
1
00:02:31,199 --> 00:02:37,399
[Music] Strong pray on the weak. [Music] Nobody does not think.
[Music] You have got one hour. [Music] You know this would happen?

2
00:02:37,759 --> 00:02:39,759
Everything changed [Music]

3
00:02:39,800 --> 00:02:43,800
Jake it's crazy here the porridge is rolling and there's no stopping him

4
00:02:44,520 --> 00:02:49,440
We're going up against gunships his bows and arrows. I guess we better stop him
EOF

FORCE_STYLE="Fontname=Roboto,Fontsize=12,PrimaryColour=&HFFFFFF,BorderStyle=4,BackColour=&H40000000,Outline=1,OutlineColour=&HFF000000,Alignment=2,MarginV=20" &&
ffmpeg -i ~/git/srs/trunk/doc/source.flv \
    -ss 150 -t 20 -vf "subtitles=./avatar.srt:force_style='${FORCE_STYLE}'" \
    -c:v libx264 -c:a copy -y output.mp4
Here are the descriptions of frequently used parameters, for more details, please refer to the link:
Fontname: Specifies the font name for subtitles. The font name should be one that is installed on the system. For instance, to use the Roboto font, setFontname=Roboto.Fontsize: Defines the size of the subtitle text. Usually, this value is an integer representing the font's point size (pt). To set the font size to 24pt, setFontsize=24.PrimaryColour: Main font color, using a &H-prefaced BGR (blue-green-red) hexadecimal format. The format is typically &HBGR, where BGR represents the hexadecimal values for blue, green, and red. To set the font color to red, usePrimaryColour=&H0000FF(red is represented as FF0000 in BGR, but reversed here to 0000FF).BackColour: Background color, also using a &H-prefaced BGR (blue-green-red) hexadecimal format. To set the background color to black, useBackColour=&H000000(black is represented as 000000 in BGR, no need to reverse).Bold: Sets whether the font is bold or not. Typically, 0 means not bold, while 1 or other positive numbers mean bold. To bold the font, setBold=1.Italic: Sets whether the font is italic or not. 0 means not italic, 1 means italic. To set the font to italic, useItalic=1.Underline: Sets whether the font has an underline or not. 0 means no underline, 1 means underline. To underline the font, setUnderline=1.StrikeOut: Sets whether the font has a strikethrough or not. 0 means no strikethrough, 1 means strikethrough. To strikethrough the font, setStrikeOut=1.BorderStyle: The style of the subtitle border. Typically, 1 means a regular border. To set a regular border, useBorderStyle=1.Outline: The width of the font's outline edges. This value is usually an integer. To set the outline width to 2, useOutline=2.Shadow: The depth of the font's shadow. This value is also an integer, representing the size of the shadow. To set the shadow depth to 1, useShadow=1.Spacingrefers to the space between characters. This value can be any floating-point number and is used to adjust the space between the text in subtitles. If you wish to increase the space between letters or characters, you can set a positive value, such asSpacing=2. To make characters more compact, set a negative value, like Spacing=-1. WhenSpacing=0.3, it means that an additional space of 0.3 is added based on the default spacing.Alignment: The alignment of the subtitles. This value is determined based on the ASS subtitle format, with values ranging from 1 to 9. These numbers correspond to positions on a 3x3 grid, where 1, 2, 3 are at the bottom, 4, 5, 6 are in the middle, and 7, 8, 9 are at the top. If you want the text to appear in the center of the screen, useAlignment=5. To align text to the center at the bottom, useAlignment=2.MarginL(Left margin): This parameter specifies the distance between the left edge of the subtitle text and the left edge of the video frame. It ensures there is some space between the text and the video's left side, preventing the text from being too close to the edge. This distance is usually in pixels, with larger values moving the subtitle text closer to the center of the video. For example,MarginL=20means the subtitles will display 20 pixels inward from the left edge of the video.MarginR(Right margin): This parameter defines the distance between the right edge of the subtitle text and the right edge of the video frame. Similar to MarginL, it helps maintain some space between the text and the video's right side, preventing the text from being too close to the edge. For example,MarginR=20ensures there is at least a 20-pixel gap between the right edge of the subtitle text and the right edge of the video frame.MarginV(Vertical margin): This parameter controls the distance between the top and bottom of the subtitle text and the top and bottom edges of the video frame. This helps adjust the position of the subtitles vertically, ensuring that the subtitle text is centered vertically on the screen or adjusted to an appropriate height as needed. For example,MarginV=10means there will be a minimum 10-pixel distance between the top and bottom of the subtitles and the top and bottom edges of the video frame.
Note: Regarding
FFmpeg force_style, you can inquire with ChatGPT for a more convenient answer.
Note: Colors can also be represented in
ABGR(Alpha, Blue, Green, Red) format, specifying transparency (Alpha) ranging from 00 to FF (hexadecimal), where 00 means completely transparent and FF means completely opaque. For example,&H80FF0000represents a semi-transparent pure blue color, where 80 refers to the transparency level (semi-transparent), FF is the maximum value for the blue component, and green and red components are both 00.
Note: If want to use other
Fontname, please download from Google Font and mount font file to/usr/local/share/fonts/in the SRS Docker.
How to Setup the Video Codec Parameters for AI Transcript
For overlaying the subtitle in video stream, the FFmpeg parameters should be:
ffmpeg \
    -i input.ts -vf '{subtitles}' \
    -c:v libx264 \ # Video codec and its parameters
    -c:a aac \ # Audio codec and its parameters
    -copyts -y output.ts
You are able to set the video codec and its parameters on the web UI, by default it is likely:
-c:v libx264 -profile:v main -preset:v medium -tune zerolatency -bf 0
So the final FFmpeg command line is:
ffmpeg \
    -i transcript/2-org-4f06f7a5-7f83-4845-9b4b-716ffec1bead.ts \
    -vf subtitles=transcript/2-audio-a982892f-1d56-4b4a-a663-f3b7f1a5b548.srt:force_style='Alignment=2,MarginV=20' \
    -c:v libx264 -profile:v main -preset:v medium -tune zerolatency -bf 0 \
    -c:a aac -copyts \
    -y transcript/2-overlay-2ba4154c-03ed-4853-bdda-d8396fcb1f47.ts
Note that -bf 0 is strongly recommended to disable B-frames, which is not supported by WebRTC.
How to Replace FFmpeg
If you are using the Docker version, you can replace the FFmpeg in Oryx with a custom version by specifying the command at startup:
-v /path/to/ffmpeg:/usr/local/bin/ffmpeg
You can use the command which ffmpeg to find the path of your FFmpeg.
Note: Non-Docker versions are not supported.
Installation of SRS is Very Slow
Some users have reported that overseas Baota installations are very slow, and accessing Alibaba Cloud's mirror is too slow.
This is because Baota cannot be used overseas. Installing other tools with Baota overseas is also very slow because downloading data across countries back to China is naturally very slow.
The overseas version of Baota is called aaPanel. Please use aaPanel, which installs software quickly, and Oryx will also switch to overseas mirror downloads.
Baota and aaPanel only have different installation methods, but the specific usage is the same. Please refer to Baota or aaPanel.
How to Install the Latest Oryx
Sometimes the version in the Baota store is older, and you can manually install the Baota plugin to install the latest plugin.
The latest version of Oryx can be found in Releases,
and the aapanel-oryx.zip attachment in each version can be downloaded as a plugin.
After downloading the plugin, you can go to Baota Software Store > Third-Party Applications > Import Plugin
and upload the downloaded aapanel-oryx.zip to install.
CentOS7 Installation Failed
CentOS 7, due to being outdated, has many issues. It is recommended to use the Ubuntu 20 system.
The Difference Between Oryx and SRS
SRS is the media engine of Oryx, for detail difference please see Compare to SRS.
Low Latency HLS
How to decrease HLS latency, how to achieve 5-second HLS low latency, see Unlock Universal Ultra-Low Latency: Achieving 5-Second HLS Live Streams for All, No Special Equipment Needed
OpenAPI
See HTTP API
HTTP Callback
See HTTP Callback
Changelog
Migrated to CHANGELOG.md.
