Introduction
Streaming video is very popular in a variety of industries, and there are many tutorials for building a media server, using SRS or NGINX-RTMP that host stream does not rely on other service providers.
But if we want to build a online video streaming service, it's much more than only a media server:
- Authentication: Because the server is on the public internet with a public IPv4 address, how to do authentication? How to block all users except they have the correct token?
- Multiple Protocols: Rather than publishing RTMP using OBS, you might need WebRTC or H5 to publish live streaming, or OBS WHIP Server for it's easy to use. You might also use SRT with some broadcasting devices. How to convert RTMP/WebRTC/SRT to HLS?
- Restreaming: Restream to multiple platforms using Oryx for wider audience reach & increased engagement. Simple & efficient solution for live streaming on YouTube, Twitch, & Facebook.
- DVR or Recording: Discover how to effortlessly record live streams using Oryx in this step-by-step guide. Learn to configure Glob Filters for selective recording and integrate S3 cloud storage for seamless server-side recording, making live streaming accessible for all.
- Transcoding: Explore the benefits of efficient live streaming transcoding using Oryx and FFmpeg for reducing bandwidth and saving costs. Learn how to optimize streaming experiences for viewers with varying internet speeds and devices, and harness the power of Oryx for smoother, cost-effective streaming.
- Virtual Live Events: Discover the benefits of virtual live events and learn how to create seamless and engaging live streaming experiences using pre-recorded content. This blog post will guide you through the process of converting recorded videos into live broadcasts for various applications, such as e-commerce, education, and online speeches.
- IP Camera Streaming: Discover how to effortlessly stream your RTSP IP camera to popular platforms like YouTube, Twitch, or Facebook using Oryx. Learn how this powerful tool simplifies the process, allowing you to connect multiple IP cameras and stream live to various platforms for an enhanced live streaming experience.
- AI Transcription: Discover the future of live streaming with AI-powered transcription and real-time subtitles using OpenAI’s Whisper. Learn how to create accessible, multilingual content for diverse audiences, revolutionizing the live streaming experience. Embrace inclusivity and reach a wider audience with AI-enhanced live streams.
Literally it's not just a media server, and seems a bit complicated, right? Yep and No!
- Yep! Building a video streaming service is something really difficult, not easy. It requires video streaming engineering, also backend service technology like Nodejs or Go, and frontend skills to build a mgmt and homepage.
- No! Rather than build all from scratch, we could build a video streaming service based on some open source solution such as Oryx, and lightweight cloud service such as DigitalOcean or AWS, it's really simple to build your video streaming service.
In this tutorial, you will learn how to set-up a video streaming service, supports publishing by browser without a plugin that is converting WebRTC to HLS, to deliver low latency (about 300ms) video streaming using SRT, and to secure the service by authentication. Furthermore, this solution is open source and very easy to get it done, via even 1-Click.
Prerequisites
To complete this guide, you need:
- OBS installed, following instructions here to download and install OBS.
- A virtual private server (VPS) instance, such as AWS Lightsail, DigitalOcean Droplets, or another similar service.
- Optionally, you may choose to utilize Oryx on your local network or personal computer. Ensure that Docker is installed for this purpose.
This guide will use placeholder your_public_ipv4 and your_domain_name throughout for streaming URLs.
Please replace them with your own IP address or domain name.
Step 1.1: Create an Oryx using AWS Lightsail
Sign up for an AWS account and sign in to AWS Lightsail. Next, click the
Create instance button. Select the Linux/Unix platform and the OS Only blueprint. Finally, choose
Ubuntu 20.04 LTS as the instance image.
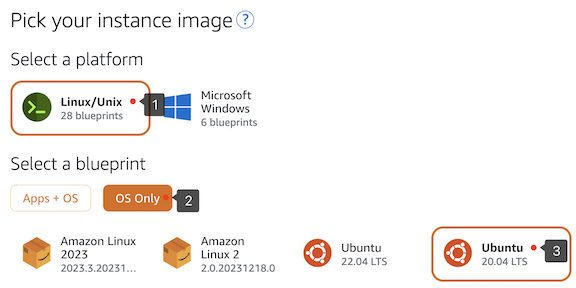
Next, click the Add launch script button and input the following script that will be executed to install
the Oryx once the instance has been created.

Please input the following script:
/bin/bash -c "$(curl -fsSL https://raw.githubusercontent.com/ossrs/oryx/HEAD/scripts/lightsail.sh)"
Note: You can also access the instance and run the script manually. Please search for instructions on how to log in to a Lightsail instance.
Next, choose the instance plan, select the 2vCPUs 1GB plan or a higher one, and click on Create instance.
Once the instance has been established, access the Networking tab and click Attach static IP to keep it
from changing. Within IPv4 Firewall, press the Add rule option, add an All protocols rule and click
the Create button:

Now, the Oryx is created! Open http://your_public_ipv4/mgmt/ in the browser, click the Submit button
to set-up the administrator password for the first time.
Step 1.2: Create an Oryx using Docker
If you prefer not to utilize AWS Lightsail, have an alternative VPS, or even a virtual machine or personal computer locally available, highly recommend using Docker for a simple and efficient way to run Oryx on VPS using just one command:
docker run --restart always -d -it --name oryx -v $HOME/data:/data \
  -p 80:2022 -p 443:2443 -p 1935:1935 -p 8000:8000/udp -p 10080:10080/udp \
  ossrs/oryx:5
After the Oryx is created, open http://your_public_ipv4/mgmt/ in the browser, click the Submit button
to set-up the administrator password for the first time.
Step 1.3: Create an Oryx using DigitalOcean Droplets
You can use DigitalOcean droplet to run Oryx just one-click. A droplet is a simple and scalable virtual machine of DigitalOcean. An SRS Droplet is a droplet with Oryx installed, to power your video streaming service.
You could create an SRS Droplet by clicking here,
then click the Create SRS Droplet button, set-up the droplet Region and Size, then click Create Droplet
button at the bottom.
Note: Recommend the size
2vCPUs 2GBor slightly larger.
After the Oryx is created, open http://your_public_ipv4/mgmt/ in the browser, click the Submit button
to set-up the administrator password for the first time.
Step 2: Publish Stream using OBS
OBS is more simple to use, and SRS provides guide for OBS, please click Scenarios > Streaming > RTMP: OBS or vMix
or open URL http://your_public_ipv4/mgmt/en/routers-scenario?tab=live with Server and StreamKey for OBS,
please copy these config and paste to OBS:
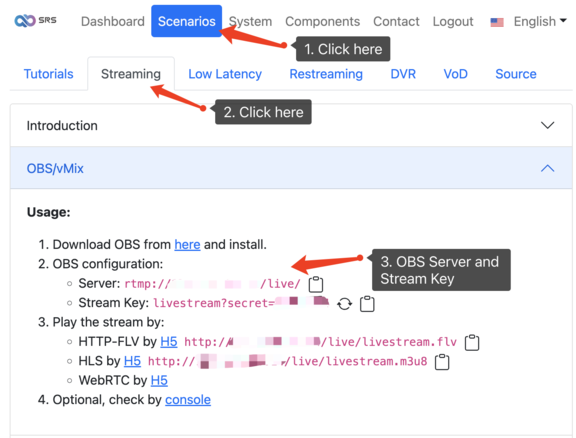
Note: There is also a guide for publishing streams by FFmpeg and WebRTC, however, it's a bit complex for WebRTC, and we will talk about it later.
After publishing an RTMP stream to SRS, you're able to play the stream by HTTP-FLV or HLS, by clicking the H5 player link, or play the URL by VLC.
Note: The latency of VLC is huge, so please use ffplay to play the RTMP or HTTP-FLV if you wanna a low latency live streaming.
Now we have finished the basic live streaming publishing and playing, note that the Stream Key contains a
secret which is used for authentication. Without this secret, SRS will deny the publisher, so only people
who know about the secret could publish an RTMP stream.
While for players, the URL is public and no secret thing, because generally we don't need to do authentication
for players. However, SRS is planned to support more authentication algorithms, including token for players,
or limits for number of connections, or disconnecting connections if they exceed a period of duration.
Step 3: Publish by WebRTC (Optional)
WebRTC or H5 is very convenient for users to share their camera, by just opening a H5 URL, to start live streaming like what OBS does. Please follow secure SRS with let's encrypt tutorial.
Because WebRTC requires HTTPS, so you need a fully registered domain name, you could purchase a domain
name on Namecheap or GoDaddy, however we will use
placeholder your_domain_name throughout this tutorial.
When you get a domain name, make sure a DNS record set-up for your server, please add an A record with
your_domain_name pointing to your server public IP address that is your_public_ipv4 as we said, see
Domains and DNS.
Now please switch to System / HTTPS / Let's Encrypt and enter your_domain_name, then click Submit
button to request a free SSL cert from Let's Encrypt:
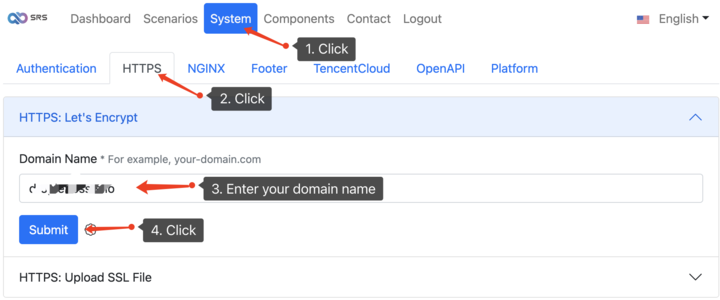
When the HTTPS is ready, please open the URL https://your_domain_name/mgmt to access Scenarios > Streaming > WebRTC: WHIP Browser
and open the URL to publish using WebRTC:
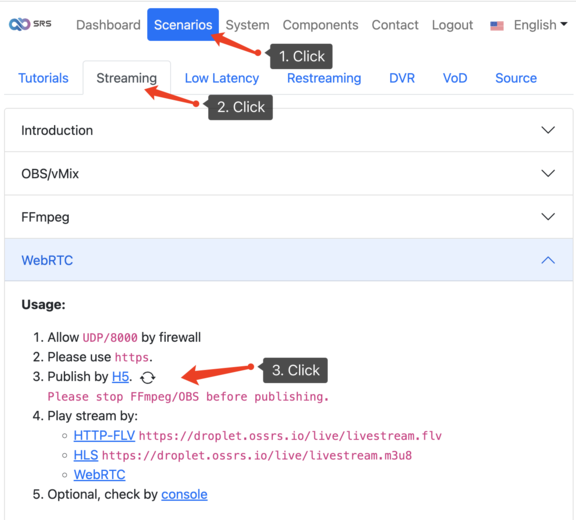
Remark: Please note that the website and stream URLs have changed to HTTPS, both HTTPS-FLV, HLS and WebRTC.
The bellow is a demo for publishing by WebRTC and playing by HTTP-FLV or HLS:
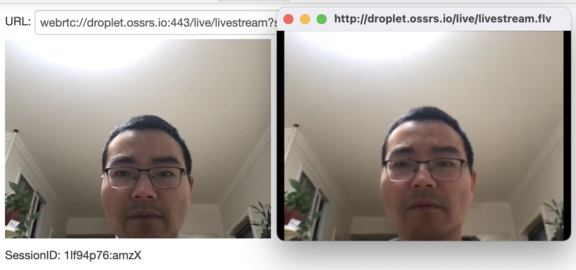
WebRTC is a bit more complex than RTMP or HLS, but using the feature by SRS, it's also very simple to set-up the HTTPS website and WebRTC signaling API, and the demo pages for WebRTC publisher and player are also very simple to use.
Step 4: Low Latency Streaming by SRT (Optional)
For RTMP/FLV, the streaming latency is about 3~5s, while 5~10s for HLS. Which protocol to use if we want to
build a low latency live streaming service, say, less than 1s?
WebRTC? No! It's too complicated, and few devices support WebRTC. WHIP is a possible choice for live streaming using WebRTC, but it's not a RFC right now(at 2022). It might take a long time to apply WebRTC to the live streaming industry, especially if we get other choices, SRT and RIST etc.
Note: Whatever, Oryx allows you to use WebRTC for live streaming, to publish by WebRTC and play by RTMP/HLS/WebRTC.
It's also very easy to use SRT, by clicking Scenarios > Streaming > SRT: OBS or vMix, the guide is use
OBS to publish SRT stream, and play by ffplay. The latency of OBS+ffplay is about 300ms, the bellow is
a lower solution, by vMix+ffplay:

Note: The end-to-end latency of SRT is 200ms to 500ms, good enough! Well, WebRTC is about 50ms to 300ms latency. WebRTC is even lower than SRT, but WebRTC also introduces more pause events and the streaming is not smooth as SRT.
SRT is supported by a lot of devices of the broadcasting industry, and softwares like OBS/vMix also support SRT, so it's actually the most stable and easy way to get low latency live streaming.
Note that H5 does not support SRT, so you can't use Chrome to play a SRT stream, however, Oryx will convert SRT to HTTP-FLV/HLS to ensure compability with general live streaming.
Other Topics
Oryx also supports restreaming to other platforms, by forking multiple FFmpeg processes, each process for a stream. It's a long story, so let's discuss it in a new tutorial.
Well DVR is another story, DVR means we convert live streaming to VoD files, so we must save the VoD files to a cloud storage. So we're developing to support more cloud storage now.
We're also considering to integrate a CMS to Oryx, to allow users to publish the live streaming rooms, or VoD files like a vlog, etc.
Oryx is a single node video streaming service, but SRS is a media server that supports clusters, like Origin Cluster, RTMP Edge Cluster and even HLS Edge Cluster. The HLS Edge Cluster is based on NGINX, and SRS could work well with NGINX, we will publish more tutorials about this topic if you wanna.
Cloud Service
At SRS, our goal is to establish a non-profit, open-source community dedicated to creating an all-in-one, out-of-the-box, open-source video solution for live streaming and WebRTC online services.
Additionally, we offer a Cloud service for those who prefer to use cloud service instead of building from scratch. Our cloud service features global network acceleration, enhanced congestion control algorithms, client SDKs for all platforms, and some free quota.
To learn more about our cloud service, click here.
Conclusion
In this tutorial, you build a video streaming service only by 1-Click, but with powerful features like authentication, SRT and WebRTC etc. If you have further questions about SRS, the wiki is a good place to start.
Contact
If you'd like to discuss with SRS, you are welcome to discord.
